
How to fix water-damaged drywall

This article contains affiliate links. We may earn a small commission on items purchased through this article, but that does not affect our editorial judgement.
Water damage is a common issue in both residential and commercial buildings. Whether caused by a burst pipe, leaky roof, or plumbing failure, water intrusion can quickly compromise the integrity of drywall. Left unaddressed, water-damaged drywall can lead to mold growth, structural issues, and costly repairs. Knowing how to identify and fix these problems promptly is essential for maintaining safety and property value.
Water damage is a common issue in both residential and commercial buildings. Whether caused by a burst pipe, leaky roof, or plumbing failure, water intrusion can quickly compromise the integrity of drywall. Left unaddressed, water-damaged drywall can lead to mold growth, structural issues, and costly repairs. Knowing how to identify and fix these problems promptly is essential for maintaining safety and property value.
This guide will walk you through the key steps of assessing, repairing, and preventing drywall water damage, as well as why accurate estimating is crucial in large-scale commercial projects.
Identifying the Signs of Water Damage in Drywall
Before you start any repair work, it's important to recognize the early signs of water damage in drywall. These include:
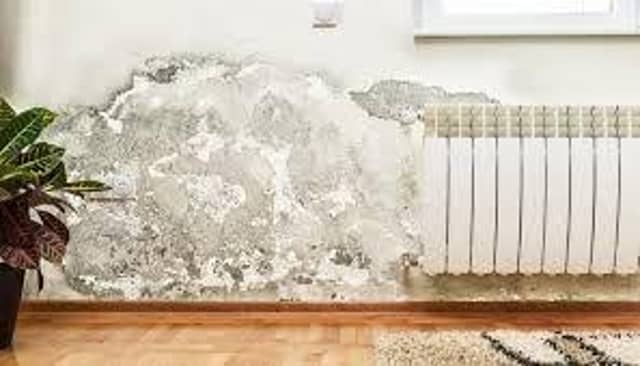
- Staining or discoloration: Yellow, brown, or dark patches on the wall or ceiling often indicate moisture behind the drywall.
- Bubbling or warping: When drywall becomes saturated, it may swell or bubble, creating an uneven surface.
- Peeling paint or wallpaper: Moisture weakens adhesive bonds, causing surface materials to loosen or fall off.
- Soft spots: If pressing on the wall feels mushy or the drywall crumbles, it’s a clear sign that the material is compromised.
- Musty odors or visible mold: Persistent dampness promotes mold growth, which not only damages walls but also affects indoor air quality.
Catching these signs early can save time and money, especially in environments where water can spread quickly and silently.
Step-by-Step Guide to Repairing Water-Damaged Drywall
1. Stop the Source of Water
Before beginning repairs, identify and fix the source of the water. Whether it’s a roof leak, plumbing issue, or high humidity, resolving the root cause is critical to avoid recurring damage.
2. Dry the Area Completely
Use fans, dehumidifiers, or professional drying equipment to eliminate moisture. Drying should take place over 24–48 hours, depending on severity. Ensure there's no dampness left in the insulation or wooden framing behind the wall.
3. Remove Damaged Drywall
If the drywall is swollen, soft, or moldy, it needs to be removed. Use a utility knife to cut away the affected area. Be sure to cut to the nearest stud for proper support during replacement.
4. Check for Mold and Treat If Needed
Inspect the exposed wall cavity for any mold growth. If mold is found, treat it with a mold-killing solution. For large infestations, consider hiring a remediation professional to ensure safety.
5. Replace with New Drywall
Measure the cut-out section and replace it with new drywall of the same thickness. Secure it with drywall screws to the studs and apply joint tape along the seams.
6. Finish and Paint
Apply joint compound over the taped seams and screw holes. Once dried, sand the surface smooth. Prime the area before painting to ensure an even finish and prevent future staining.
When to Call a Professional
While small patches of drywall damage can often be repaired by homeowners, larger or more severe damage, especially in ceilings or commercial buildings, should be handled by professionals. They have the tools and experience to handle complex repairs safely and efficiently.
Additionally, when you're dealing with large properties or construction projects, it's important to get accurate material and labor estimates before starting repairs. This is where commercial drywall estimating becomes a vital service. By partnering with experts who provide detailed cost breakdowns, contractors can avoid budget overruns and unexpected issues during restoration or construction.
Preventing Future Drywall Damage
To reduce the risk of future problems:
- Inspect roofs, windows, and plumbing regularly.
- Ensure proper ventilation in bathrooms and kitchens.
- Use moisture-resistant drywall in high-humidity areas.
- Install sump pumps or waterproofing systems in basements.
Being proactive with maintenance can prevent the need for costly repairs down the road.
Final Thoughts
Water-damaged drywall can be a silent threat to the safety and value of any property. Whether you're managing a residential home or a large commercial facility, acting quickly and efficiently is key. Recognizing the signs of water damage in drywall early allows for simpler fixes, while accurate estimating ensures smart resource planning, especially at scale.
If you’re overseeing multiple units or large-scale building repairs, don’t underestimate the value of commercial drywall estimating. It saves time, improves budgeting accuracy, and sets the foundation for quality outcomes. Repair the damage, restore the strength, and protect your investment with the right tools and team.

With the housing market continuing to shift in many parts of the UK, homeowners often choose to start by getting an up-to-date view of what their property could be worth. Estate agent Purplebricks offers a free, no-obligation valuation carried out by a local property expert familiar with current prices and demand in the area 📊.
The appointment typically includes an assessment of the property’s likely market value along with guidance on pricing and presentation if the owner decides to sell 💷. Valuations can be arranged online in just a few minutes by choosing a convenient appointment time and requesting a visit from a local property specialist.
👉 Book a free property valuation with Purplebricks here.