Travel photography: how to take holiday photos to be proud of - even if you have no skill with a camera


It’s a truth universally acknowledged that everyone takes entirely too many photos these days. Be it on our phones, or dabbling about with a DSLR, digital photography has made us trigger happy (or shutter happy) but not necessarily more skilled. So how do you start to turn your holiday pics into something you’ll want to display?
We spoke to NationalWorld’s Senior Video Producer, and passionate photographer, Craig Sinclair about how he snaps scintillating images when he’s holidaying - and how you can too.
Advertisement
Hide AdAdvertisement
Hide Ad“It’s a case of learning the basics first. Master a few key rules and you can start messing around with some more unusual approaches to create truly memorable images,” notes Craig, who outlines the basics as such:
- Using a nine grid to compose your photos
- Finding the right light for more beautiful images
- Finding the best time of day to take your pictures
- Finding the best angles to flatter you and accentuate landscapes
- Capturing great street photos

Using a nine-grid to highlight your subject
First things first - pick your subject. What are you photographing and why? Try to make sure there's a specific focal point for viewers, and avoid including other elements that obscure or fight with the main subject. Clutter is not necessary. Once you know what you want to shoot, use the nine-grid - or rule of thirds.
If the phrase 'nine-grid' alone has you twitching (and as one who perpetually photographs their own thumb, we understand), don't worry. It's simpler than you might initially imagine. This is a nine-grid:
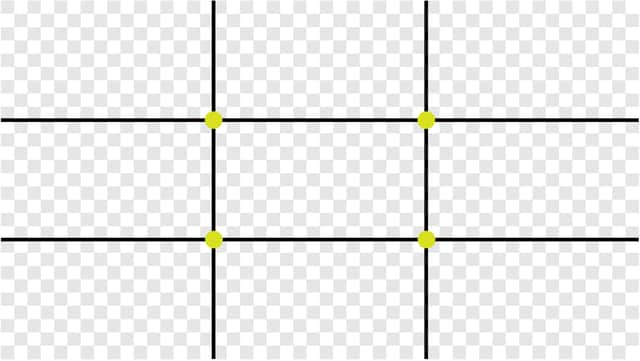
Depending on your camera, you may already have this feature built in. On iPhones, you can switch it on easily - go to Settings, tap Camera, and then enable the Grid option. Voila!
Advertisement
Hide AdAdvertisement
Hide AdIf not, try to remember the grid and the dots as a means of choosing how you frame things.
“How you position your subject on different parts of the grid can emphasise its importance - you can use it to draw the viewer’s eye,” Craig explains. If the photo is a portrait, a person's face is the subject. In a landscape photo, the subject may be a building, a boat, the sunset, for example. He breaks down using the grid further:
- Centring a subject in the middle is the easiest way to draw attention to it - and ideal for a square or vertical Instagram pic. It's not that visually interesting, though.
- If your subject is a living thing, positioning their eye-line on the top line draws attention to their face, which helps lend them life within the picture. It's good if they're the main focus of the picture.
- Framing your subjects eye-line on the bottom line helps convey they are small in relation to the rest of the photo, which is great if you're looking to capture a sense of grandeur - i.e. if they're looking at a spectacular view.
- If the scenery itself is the main draw, positioning a subject - be it the sunset, a human being, a building - to one side either on the left or right vertical line is a great way to frame a subject and reveal the scenery without blocking anything significant. If it is a human, position your subject’s eye-line on the horizontal lines to show the size of the subject in relation to the scene.
- If the subject is moving - say, a person walking or moving animal - positioning them on the left or right vertical line (depending on which way they are facing) will convey the sense they are moving forward into the negative space. It's great for more 'candid' shots.
If your camera doesn't have an in-built grid, mentally picturing the nine squares is a good way to compose your photos. You don't need to get everything perfectly where the lines fall - you're simply looking to improve your framing.
How to use the light around you to take great shots

Even those without a natural inclination for the artful will be aware of how light transforms images. It's tricky for those of us who don't have an eye for these things to know how to use it to best advantage. Craig has some basic rules:
Advertisement
Hide AdAdvertisement
Hide Ad"If you are off to a sunny destination in the peak season, most cameras will have an abundance of light, which is ideal for capturing crystal images. However, that doesn’t mean you should just ignore where your light is positioned.

“If at all possible, avoid facing the sun. This will make your subjects squint when facing the camera or burn out their retinas. It also creates a flat image - it makes a scene look very two-dimensional, when what people want to see is your subject ‘popping’ out."
The art of finding the 'right light' comes with practice, and you'll be wanting to find a happy marriage of its colour, quality, and direction. Craig checks the direction of the sun by holding his hand out. "I look at how soft the shadows are, how harsh the light is and look at the shadows cast on the ground. Ideally I want the sun to be at angle between 30 and 90 degrees from the front of my subject."
He adds: "The same rule of thumb applies at night - you want to make sure your light source (whether it’s a lamp, shop window or light fixture) is to the side, not above. But you may be limited by the technology of your camera, which will affect the quality of your photos."
Light at the different stages of the day
Advertisement
Hide AdAdvertisement
Hide AdLooking at your subject in relation to the light, you'll notice that - naturally - light changes as the time of day progresses. With this in mind, Craig has some advice on the best time of day for snaps.
"Take these tips with a pinch of salt!" he advises, "you're on holiday, after all."
Golden Hour
"Depending on the time year and your location, it's the hour or so after sunrise and before sunset, when the angle of the sun is very low. The quality of light is very soft, warm and very flattering."
That soft, warm light helps cast long shadows, so the texture and shape of landscapes are accentuated, while the golden quality of the light helps people look healthy and glowing.
Advertisement
Hide AdAdvertisement
Hide Ad"I use an app called Sun Location to find out the times of Golden Hour, sunset and sunrise relative to my location," says Craig.
As to high noon - this isn't, apparently, the time to be capturing portraiture "when the sun is directly above you, it's not very flattering - aside from squinting, it can cause shadows under the eyes and accentuate flaws." That said, it can be an effective time to capture landscape shots.
The best angles for flattering selfies and landscape shots
While we'd love to be above vanity, many of us - maybe even most of us - hope to capture flattering pictures of ourselves when we're in foreign locales. Here, Craig has a handy tip: "The high angle selfie might hide the double chin, but it gives flat lighting. Instead opt an angle either slightly above or below your eyeline. Smile, and lift your eyes to the camera."
As to low angle shots - these can be great if you're taking pics of buildings or landmarks. Getting down low and shooting upwards will help give a sense of the scale of the subject.
How the position of the horizon changes your photo

Advertisement
Hide AdAdvertisement
Hide AdYou've taken note of the light, the time of day. You've mastered the nine-grid and you've got a good grip of what you want your subject to be. If you can adjust your holiday to take photos of it "when the weather or position of the sun is more favourable" so much the better, says Craig, but he's vehement about the position of the horizon.
"I try not to be firm in my rules but NEVER take a landscape photo and position your horizon in the centre of the frame. Instead align the horizon with one of the horizontal lines on your nine grid. Line up your horizon with the bottom horizontal to emphasise the drama of the sky above your scene. Or line it up to the top horizontal line to reveal the leading line of a road, path, field of crops and flowers or people."
Street photography: an exercise in mindfulness

For many of us, the most fascinating photos from people's holidays capture the people of a city, and their idiosyncratic modes of life. For Craig, photographing people and cities in a way that gets to the essence of both is a particular passion. He advises on street photography:
"The concept of street photography can be as interactive or as passive as you like. Ultimately, it should be relaxing, something of a confidence booster.
Advertisement
Hide AdAdvertisement
Hide Ad"The art is to take a beat, find a spot and observe the scene. Watch for patterns in movement, comings and goings, regular characters. Shop owners, dog walkers, somebody waiting, other tourists. Keep an eye out for anything unique about the way they move, the actions they’re performing or how they interact with the scene.
"When you feel you’ve found something interesting, take your camera and start taking pictures until you capture a moment. If there's a person you're particularly intrigued by, whip out your pocket translator and ask somebody to pose for you. I find a friendly smile, an honest introduction, and a pleasant reason as to why you’d like to take this person’s picture is the best approach. Don’t be creepy about it. And prepare for some rejection. Be nice about it.
"Take your time, and street photography can be a fun way to learn about the culture of the city you’re visiting, while having a coffee or wandering around. It's a great wait to slow you down so you can enjoy your holiday."
Comment Guidelines
National World encourages reader discussion on our stories. User feedback, insights and back-and-forth exchanges add a rich layer of context to reporting. Please review our Community Guidelines before commenting.