How to solve a rubik’s cube? Algorithms explained - and how to complete a rubik’s cube in 5 steps

and live on Freeview channel 276
There’s nothing quite like the satisfaction of cracking a puzzle - but sometimes, despite our best efforts, success evades us. For those picking up a rubik’s cube for the first time, it may seem like solving the puzzle is just a matter of time, determination and a bit of dumb luck.
But, there is actually a method to the madness of a rubik’s cube, for those who are really committed to seeing the cube completed.
This is how to solve a rubik’s cube.
Rubik’s cube notations
Advertisement
Hide AdAdvertisement
Hide AdBefore we get started with the actual solving, first we have to split up the cube into different categories to make it easier to describe the actions going on.
On most rubik’s cube resources, the puzzle is split up like this:
- F (front): the front face, facing the solver
- B (back): the back face, opposite the front face
- R (right): the right face
- L (left): the left face, opposite the right face
- U (up): the upper face
- D (down): the bottom face, opposite the upper face
Just the single letter means turning that face 90 degrees clockwise in a single turn, for example F.

A letter followed by an apostrophe means turning that face 90 degrees counterclockwise in a single turn, for example F’.
Advertisement
Hide AdAdvertisement
Hide AdA letter followed by a 2 means turning that face 180 degrees (aka a double turn) for example, F2.
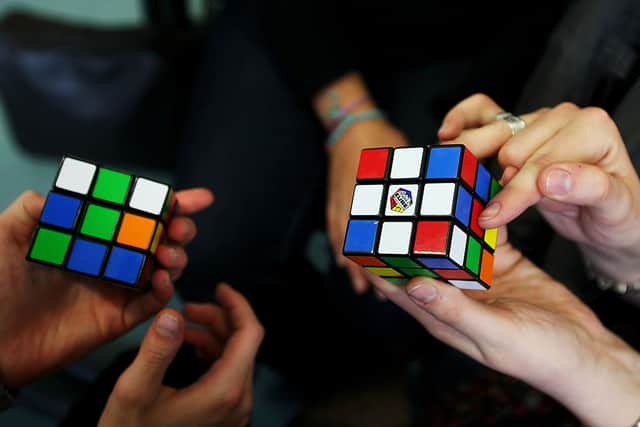
A rubik’s cube is made up of 26 pieces:
- A corner piece, which has three different colour stickers on it
- An edge piece, which has two different colour stickers on it
- A centre piece, which just has one colour sticker on it
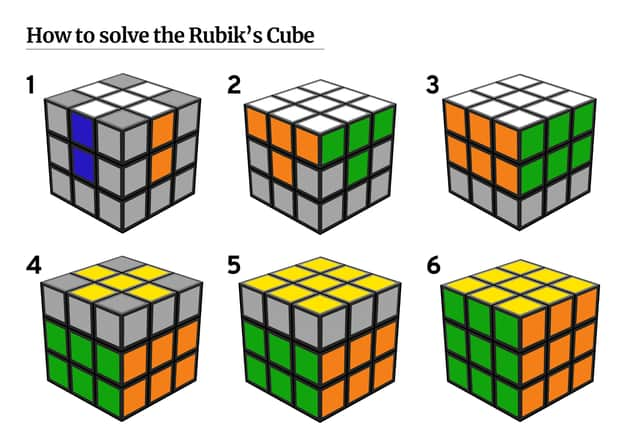
Step one: solve the white cross
You’re going to want to begin your cube solving journey by beginning with the white face of the puzzle.
This step can be a bit confusing for rubik’s cube beginners, so just take your time and you’ll get there in the end.
You’ll notice on your rubik’s cube that the centre pieces on each side (called a face) can’t be moved to another spot, only rotated around - so you’re going to use that to your advantage when getting your rubik’s cube started.
Advertisement
Hide AdAdvertisement
Hide AdTo begin, you’ll want to get each white edge together on the upper face of the cube - you don’t have to worry too much about making sure the centre is also white, just focus on getting the edges.
Once you’ve done that, you’ll need to flip some of the edges so that all of the white stickers face upwards to make a plus.
Hold your cube so that one of the edges that needs to be flipped is facing you, and then apply this algorithm: F, R’, D’, R, F2
This algorithm will flip the edge so that the white part is facing upwards - repeat this for every edge until you have a white cross on top.
Advertisement
Hide AdAdvertisement
Hide AdNext you’ll need to orient these pieces - what you’re looking for is that the other colour on the other sticker of your white edge piece aligns with the colour sticker in the centre of each face.
If you have none matching, you’ll need to perform a U move, then look at your cube again. You want to have at least two matching. If none of them have lined up yet, do another U move and repeat until you have either two or four edges matching their centres.
If you only have two of your edge and centre stickers matching then you may be in one of two scenarios.
Either the two matching edges are adjacent to each other, or they are opposite each other.
Advertisement
Hide AdAdvertisement
Hide AdIf adjacent, hold the cube so that the two solved pieces are facing the front and left of the cube and then apply this algorithm: R’, U, R, U’, R’
If the matching edges are opposite each other, hold the cube so that they are on the left and right faces and perform this algorithm: R2, L2, U2, R2, L2
In theory your white cross should now be solved.
Step two: the white corners
Now that you’ve got your white edges figured out, the next step is to solve the white corners as well.
This step should be easier to achieve as it only requires one algorithm.
Advertisement
Hide AdAdvertisement
Hide AdNow, look at the bottom layer of the rubik’s cube - you’re looking for the white-orange-green corner. There is a 50% chance that it will be on the bottom layer.
These are the steps that you need to take depending on where the corner is for you.
If the corner is on the bottom of the puzzle, then perform the required D moves so that the corner is in the bottom right position in your cube. You may need to perform this algorithm a few times in order to get it to where it needs to be: R’ D’ R D
If the corner is on the top of the puzzle, hold your cube so that the corner is in the upper right corner of your cube and again, perform the same action as before: R’ D’ R D
Advertisement
Hide AdAdvertisement
Hide AdNow that the corner is on the bottom, you can refer back to the instructions above.
Keep repeating this process until the top layer is solved.
Step three: solve the middle layer edges
Now that you’ve got the white face of your cube solved, flip your rubik’s cube so that the white layer is on the bottom.
Look for an edge that is on the top face that does not have yellow on it. There is a chance there won’t be any, but we’ll get to that in a moment.
Perform a U move so that the colour on the front face of the edge is matching with the centre.
Advertisement
Hide AdAdvertisement
Hide AdThere are two directions that the edge could go, left or right.
If the edge needs to go in the gap to the left of it, do this algorithm: U’ L’ U L U F U’ F’
Alternatively, if it needs to go to the right, do this instead: U R U’ R’ U’ F’ U F
If there are no more edges left on the top layer, then they are probably either in the right place but need flipping - or they’re in the wrong place.
Advertisement
Hide AdAdvertisement
Hide AdTo get an edge out of somewhere it shouldn’t be, just insert one of the yellow edges into that slot - this should get the edge out and on the top layer, ready for you to use the above algorithm to situate it correctly.
Now, repeat this process for all four middle edges.
Step four: solve the yellow cross
If you’ve made it this far, congratulations! You’re not two thirds of the way through solving your rubik’s cube.
Every piece left to be solved has yellow on it somewhere - so what we’re going to do now is solve the toy layer edges in two steps, which will orient all of the pieces so that the yellow face is facing up for all of them.
Ignore the corners of your cube for now and focus solely on the edges. Either none, all or two of the edges will be oriented correctly, with the yellow facing up.
Advertisement
Hide AdAdvertisement
Hide AdThere are four possible edge positions your yellow square could be positioned - no edges and just the centre yellow square, an L shape going through the centre square, a line going through a centre square or the cross shape.
If your edges are solved in a plus shape like the cross that we made at the start of this tutorial, you can skip this stage - if not, then keep on reading.
If you have a dot, then use the following algorithm three times. If you have a yellow L shape then only do it twice and if you have a line only do it once.
Holding the cube with the yellow on the upper face, do: F R U R’ U’ F’
Advertisement
Hide AdAdvertisement
Hide AdAfter making the yellow cross on the top of the cube, you need to do what you did with the white cross previously and fill in the edge pieces.
With the yellow still on the upper face, use this algorithm: R U R’ U R U2 R’ U
You might find you need to do this more than once.
Now it’s time for the yellow corners to be put in their place.
Find a piece which is already in the right place and move it to the right front top corner and use this algorithm to to switch the three wrong pieces: U R U’ L’ U R’ U’ L
Advertisement
Hide AdAdvertisement
Hide AdDo this twice to do an inverse rotation of the pieces. If none of the yellow corners are in the right place to begin with, apply the algorithm until you get one in a good place.
Step five: orient the yellow corners
To finish your rubik’s cube you’ll need to orient your yellow corners. This can be a confusing step, so take your time.
Hold the cube so that an unsolved corner is on the front right top corner and apply this algorithm either twice or four times until that piece is oriented correctly: R’ D’ R D
If it looks like you’ve totally messed up your cube, don’t worry! This is to be expected at this stage.
Advertisement
Hide AdAdvertisement
Hide AdTurn the top layer only to move another unsolved yellow piece to the front right top corner and do the same R’ D’ R D until the specific piece is in the right spot. Be careful not to move the bottom two layers when you’re doing this - and definitely don’t rotate the whole cube.
Repeat until your cube is solved.
Comment Guidelines
National World encourages reader discussion on our stories. User feedback, insights and back-and-forth exchanges add a rich layer of context to reporting. Please review our Community Guidelines before commenting.